TL;DR: OPNSense’s official os-tailscale plugin handles auth and route advertising through the WebUI, but advertised routes are inert until manually approved on the control server (Tailscale admin panel or headscale routes enable), and the plugin creates tailscale0 without any firewall rules — traffic from the tailnet to local subnets is blocked by default. This documents the full setup: install from community plugins, configure control server URL and auth key, advertise subnet CIDRs, approve on the control server, add explicit firewall rules for tailnet → LAN/DMZ, and enable tailscale0 in the WebGUI and SSH listen interfaces so OPNSense itself is reachable over the tailnet.
OPNSense’s os-tailscale plugin does more than most people expect and less than the docs suggest. The WebUI covers auth and route advertising, but the firewall is deliberately unaware of the new interface — and so is OPNSense’s own service listener. Getting the tailnet to reach a DMZ requires three separate subsystems to agree: the control server, the firewall ruleset, and the administration interface bindings. This post documents where each of those gaps hides and how to close them.
The node was in the tailnet. The route was advertised. Traffic still didn’t arrive. The subnet showed up in tailscale status on client devices, routes were listed on the Headscale side, and yet nothing from the tailnet could reach 192.168.50.0/24. No error, no ICMP unreachable — packets just disappeared somewhere between the Tailscale interface and the DMZ. It took checking three separate places before the full picture emerged: route approval on the control server, a missing firewall rule on tailscale0, and a default-deny that applies to the firewall host itself.
This post is for homelab operators running OPNSense who already understand basic firewall concepts — interfaces, rules, aliases — and want Tailscale working as a subnet router without dropping to the shell. It assumes you have either a Tailscale account or a self-hosted Headscale instance already running.
See also Persistent SSH and Tailscale on Steam Deck / SteamOS for the client side of the same tailnet — this post covers the gateway, that one covers a client.
Install os-tailscale from the community plugin list
Go to System → Firmware → Plugins. By default the list shows only official plugins — click “Click to view the community plugins” in the bottom-left corner to expand it.
Search for os-tailscale and click + to install. Reload the page after it completes. The VPN → Tailscale menu will appear in the sidebar.
Connect to Tailscale or Headscale and verify the node is online
Under VPN → Tailscale → Settings, configure the control server (default for Tailscale, or your Headscale instance URL) and the auth key generated from the admin panel. Save and apply.
To confirm the node is connected, check VPN → Tailscale → Settings → Status:
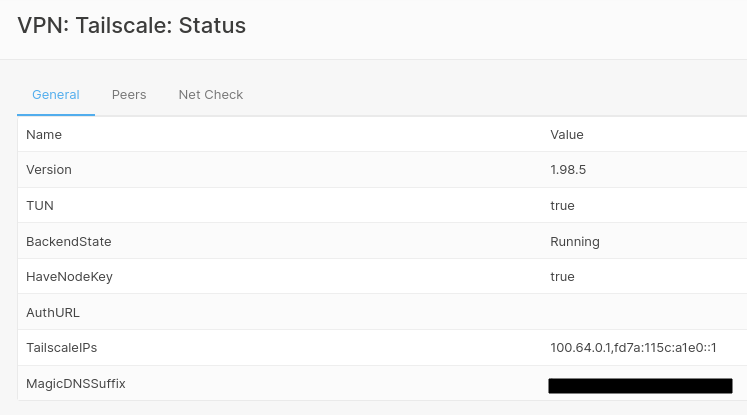
The OPNSense node should appear online with an IP in the 100.64.0.0/10 range.
Advertise subnet routes — the plugin half of the job
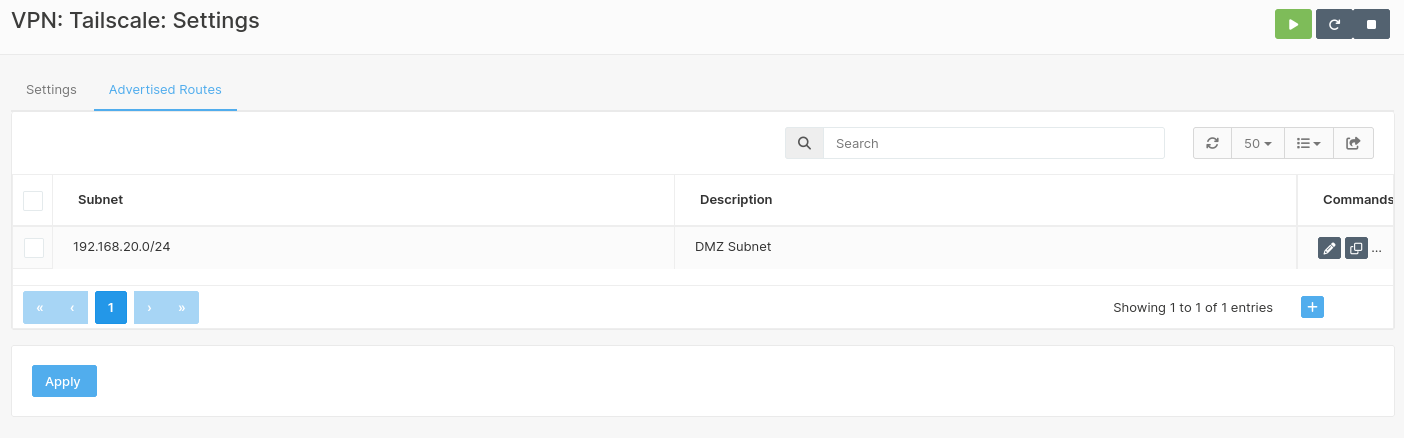
For devices on the tailnet to reach local networks on OPNSense — like a DMZ — you need to advertise the subnets under VPN → Tailscale → Settings → Advertised Routes.
Add the DMZ CIDR: 192.168.50.0/24.
Approve the advertised route on the control server — this step is not optional
Advertised routes do nothing until approved. The plugin cannot do this for you; it has no write access to the control plane.
Tailscale: in the admin panel at login.tailscale.com/admin/machines, find the OPNSense node, click the three dots → Edit route settings and enable the subnet.
Headscale: list pending routes and enable by ID:
headscale routes list
headscale routes enable -r <id>
The ID corresponds to the route listed for the OPNSense node. Confirm with headscale routes list again — the Enabled field should be true.
Add firewall rules — the plugin creates the interface but not the policy
The plugin creates the tailscale0 interface, but rules must be added manually. OPNSense’s default posture is deny-all on new interfaces, so the tailnet can reach OPNSense’s IP but cannot forward traffic anywhere beyond it without explicit rules.
Before creating rules, create an alias for the Tailscale network under Firewall → Aliases:
| Field | Value |
|---|---|
| Name | tailscale_net |
| Type | Network |
| Network | 100.64.0.0/10 |
| Description | Tailscale CGNAT range |
Using an alias avoids hardcoding the CIDR in every rule and makes maintenance easier.
Allow Tailscale → DMZ traffic
Under Firewall → Rules → Tailscale:
| Field | Value |
|---|---|
| Action | Pass |
| Interface | Tailscale |
| Direction | in |
| Protocol | any |
| Source | tailscale_net |
| Destination | 192.168.50.0/24 |
| Description | Tailscale → DMZ |
Allow DMZ → tailnet access (optional)
Under Firewall → Rules → DMZ (or the corresponding interface):
| Field | Value |
|---|---|
| Action | Pass |
| Protocol | any |
| Source | 192.168.50.0/24 |
| Destination | tailscale_net |
| Description | DMZ → Tailscale |
Without this second rule, traffic initiated by DMZ hosts toward the tailnet is dropped by the default firewall state.
Allow access to OPNSense itself via Tailscale — the firewall is also a host
By default, OPNSense does not accept connections destined to itself coming from the Tailscale interface. To reach the WebGUI and SSH via the firewall’s Tailscale address (100.64.x.x), add a rule under Firewall → Rules → Tailscale:
| Field | Value |
|---|---|
| Action | Pass |
| Interface | Tailscale |
| Direction | in |
| Protocol | any |
| Source | tailscale_net |
| Destination | This Firewall |
| Description | Tailscale → OPNSense (WebGUI, SSH, services) |
Without this rule, packets destined to the firewall itself arrive on tailscale0 but are dropped before reaching any service.
Bind WebGUI and SSH to the Tailscale interface — rules are necessary but not sufficient
Even with the firewall rule in place, OPNSense only responds on interfaces explicitly configured for each service. Go to System → Settings → Administration:
- WebGUI: in the Listen Interfaces field, add the Tailscale interface (alongside any already configured).
- Secure Shell: in the SSH Listen Interfaces field, add the Tailscale interface.
Save and apply. After that, curl https://100.64.x.x:443 (or whichever port is configured) should return the OPNSense login page.
What this setup does not cover and when to reconsider it
This configuration gives you a subnet router: any device on the tailnet can reach the DMZ via OPNSense, and optionally vice versa. What it does not give you is exit node behaviour, split DNS, or MagicDNS resolution for hostnames inside the DMZ — those require additional configuration on both the Tailscale/Headscale side and inside OPNSense’s DNS resolver.
The three-checkpoint mental model — control server approval, firewall ruleset, service listener binding — applies any time you add a new interface in OPNSense, not just Tailscale. The plugin handles the Tailscale daemon and key management; everything else is standard OPNSense behaviour. If you later upgrade os-tailscale or OPNSense itself, the firewall rules and listen interface settings persist independently of the plugin — they will not be wiped, but they are also not managed by it, so drift is your responsibility to detect.
If your threat model requires isolating tailnet access to specific users or devices rather than the entire 100.64.0.0/10 range, replace the tailscale_net alias with per-device Tailscale IPs and adjust rules accordingly. The CGNAT alias is a starting point for a trusted tailnet; it is not appropriate if your tailnet includes devices you do not fully control.
References
- os-tailscale plugin (OPNSense community) — source for the WebUI plugin; installed via System → Firmware → Plugins, community tab
- Tailscale: subnet routers and route approval — official docs covering subnet router setup and the mandatory manual approval step on the control server
- Headscale: routes CLI reference —
headscale routes listandroutes enablecommands used to approve advertised routes on self-hosted control servers - Tailscale IP address range (CGNAT) — explains the 100.64.0.0/10 allocation and why this range is used for the firewall alias